
Remember how Ashar loves Pinterest now?
Well, today, she pinned something she wanted to make. It was a “fortune-teller” that looks like a lion. (If you’re not sure what a “fortune-teller” out of paper is, it’s basically an origami thing that has little fortunes or messages inside it, and you wiggle it back and forth a particular number of times to reveal your fortune.)
Anyway, the fortune-teller was super-cute. But the instructions on how to make it? They were in a foreign language.
Ashar also loves her some Google. And, apparently, she knows how to make it work for her. I was working and not paying any attention to her, and she turns to me and announces the following:
“Mom, I found something I want to make, but the instructions were in Dutch, so I used Google Translate so we can read them.”
She knew how to use the language auto-detect feature, converted the instructions to English, AND used the voice synthesizer to “read” the Dutch version so she’d know what it sounded like.
Here are the original instructions, with pictures.
But, to save you the translation, here is Ashar’s version of the instructions, helpfully in English!
First, download the two-page PDF template here.
- Print out both pages of the PDF, and cut out the square (“lion”) piece.
- Cut the diamond-patterned page into a square the same size. “If you don’t know how to fold a square, take it and make a triangle, and then unfold it,” Ashar says.
- Take that diamond-patterned paper and fold it in half horizontally, then unfold it again.
- Do the same thing vertically – fold the diamond paper, then unfold it again.
- Take the diamond-patterned paper and put the back of it against the back of the lion-printed paper.
- With the diamond side facing up, fold one corner (of both pieces) toward the center. (You’ll see the lines on the lion side that show you where it should go.)
- Repeat that for all the other corners.
- Now turn the paper over, so that the plain blue side is up. Do the same thing back here – take each corner and fold it toward the middle.
- Turn the paper over once more, and take the double layers at the corners and slide your fingers inside them, toward the corners, and fold them up. Your goal here is to make little “pockets” to put your fingers into.
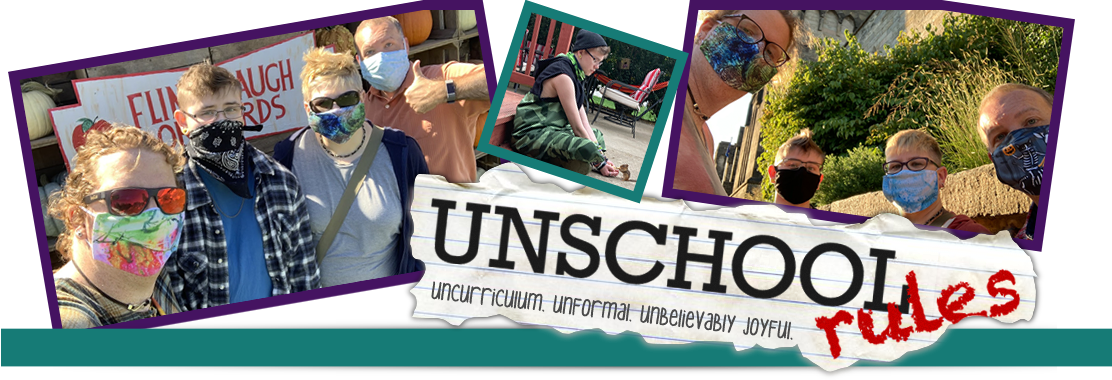
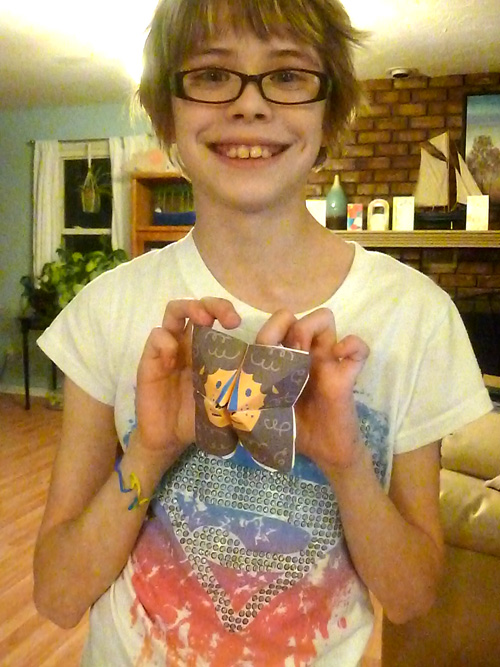
- Now you can make the lion open and close his mouth by using your fingers to move him back and forth! You might have to work at this a little; it’s hard to get the hang of at first. Ashar is modeling both “open” and “closed” lion mouths here, and you can also check out the pictures on the original for a better idea!
Give it a try! We had fun making it – and using Google Translate!
Awesome job, Sarah! My girls love these fortune teller kinds of things 🙂
P.S. In my opinion, this is good Look What We Did (http://lookwhatwedid-homeschool.blogspot.com) material, if you’re interested!
EXCELLENT! Linked it up just now. 🙂 And Sarah says THANKS!
You’re welcome Sarah 🙂 I’m glad you linked it up!
So smart! Thanks for linking this up to Homeschooling on the Cheap! I’m featuring the post today on my Facebook page at 3pm. I wasn’t sure if you were on Facebook. If so, stop over!
have a great week, Kelli
Oh, that’s AWESOME!!! I’ll definitely stop on by! 🙂 Thanks!